
Facebook Advertising, BLOG, Marketing & SEO
How to Manage Facebook Ad Campaigns in Mailchimp: 5 Steps
Nov
A couple of weeks after launching my first Facebook ad, I logged into Mailchimp to check how things were going. But I quickly got confused. Where could I find my ad? Who was in charge of the budget? Was I supposed to manage everything through Mailchimp or Meta? I spent time clicking through different menus before realizing I had misunderstood how the two platforms worked.
The good news is that managing your campaigns doesn’t have to be confusing. In this guide, I’ll show you how to manage Facebook ad campaigns in Mailchimp for small business in five simple steps. Mailchimp helps organize your contacts and audiences, while Meta handles your ads. Once you understand how these roles work together, how to manage Facebook ad campaigns becomes much easier, even when you’re short on time.
What Does It Mean to Manage Facebook Ad Campaigns in Mailchimp?
Managing Facebook ad campaigns through Mailchimp splits the work between two platforms. Mailchimp handles contacts, segments, and the connection. Meta handles ad delivery, budgets, pauses, and ad reports.
Where Each Job Happens: Mailchimp vs Meta
Mailchimp stores customer data, and Meta delivers ads. This split is the base of how to manage Facebook ad campaigns in Mailchimp.
Mailchimp holds the customer list, builds segments, and syncs each audience to Meta through the Meta Business Extension. It also runs automation flows and produces email and store reports.
Meta holds the ad account and the Meta Pixel. It also controls ad delivery on Facebook and Instagram, budgets, pauses, and ad reports.
Ads bought through Meta are paid ads. Posts that cost nothing are organic posts.
What You Need Before You Manage Campaigns
Three items are required before the connection works:
- An active Meta Business Manager account
- A Meta ad account
- A customer list Custom Audience
The connection also asks for a Facebook Page, an Instagram profile, and a Meta Pixel. Each permission request requires approval. Changing permissions later requires a disconnect and a reconnect. One Mailchimp account connects to one Meta business account. Meta also considers the age of a Business Manager account.
Which Mailchimp Plan Helps?
All Mailchimp Marketing plans, such as Essentials and Standard, can install the Meta Business Extension. Some Meta and Instagram features depend on the plan. Three tools ask for more:
- The Meta Custom Audience action in automation flows needs the Standard plan or higher.
- Conversion Insights needs the Standard plan or higher, plus a connected store.
- Pre-built segments need a connected store with order data.
Prices change often, so Mailchimp’s pricing page lists current costs. With a plan that fits, how to manage Facebook ad campaigns in Mailchimp becomes simpler.
How to Manage Facebook Ad Campaigns in Mailchimp Step by Step
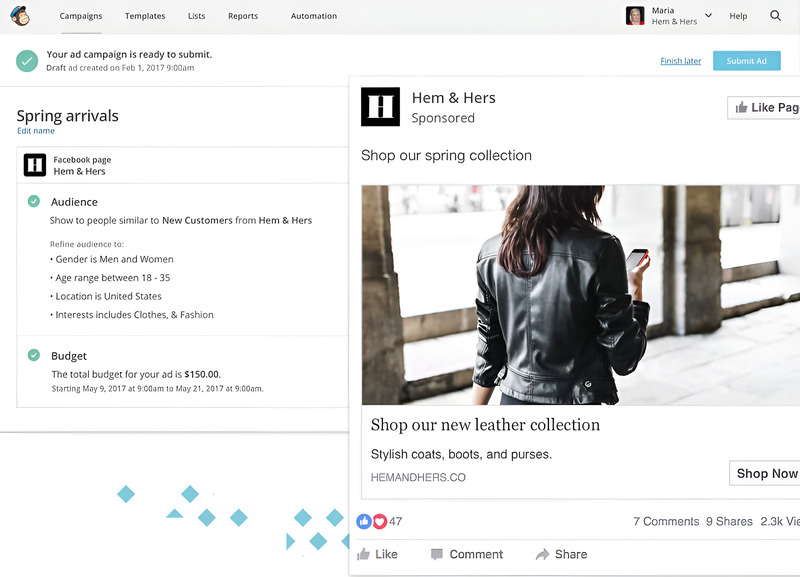
Five steps keep a campaign healthy. Two cover the connection and the audience. Two cover segments and the ads. One covers results. Here is how to manage Facebook ad campaigns in Mailchimp, one calm step at a time.
Steps 1–2: Keep Your Connection and Audience Healthy
Step 1: Check the connection. Open Integrations in Mailchimp. Find the Meta Business Extension app page. Confirm five items: your Business Manager account, Facebook Page, Instagram profile, ad account, and Meta Pixel. These five are meronyms of your Meta business setup, the holonym. To change a permission, disconnect and reconnect.
Step 2: Clean your audience. Remove old and fake email addresses from your contact list. Keep only contacts who agreed to receive marketing. Then check automatic advanced matching. It matches your customer details with people on Facebook. Clean data gives Meta better details to match. Dirty data does the opposite.
Steps 3–4: Update Segments, Then Launch or Pause Ads
Step 3: Update your segments. Pick the group that fits today’s goal. With a connected store, Mailchimp offers six ready-made groups: First-time Customers, Repeat Customers, Lapsed Customers, High-value Customers, Recent Customers, and Potential Customers. These six are hyponyms of segments, the hypernym. An automation flow can also target a Meta Custom Audience. That action needs the Standard plan or higher.
Step 4: Launch, change, or pause the ad. At the end of the connection, click Create Ad to build a new Meta ad. Or click Done and use Meta’s ad tools later. Choose your synced custom audience as the target. Set a small daily budget. Use one image, one short message, and one button.
Meta runs the ads, so you change a budget or pause an ad in Meta’s tools. Mailchimp’s help pages do not describe those screens, so follow Meta’s own guides. Pause an ad that does not work after a fair test.
Step 5: Track Results and Adjust
Open Meta’s ad reports. Watch four numbers:
- Reach
- Click-through rate
- Cost per click
- Conversion rate
These four are hyponyms of ad metrics. Compare each ad with its goal. A win-back ad aims for repeat orders, not only clicks.
For your email sales, open Analytics, then Reports, then View Report, then the E-commerce tab. Net revenue leaves out shipping and taxes. With the Standard plan or higher and a connected store, Conversion Insights adds revenue per recipient and predictive segments. Then change one thing at a time. That is how to manage Facebook ad campaigns in Mailchimp from first click to first lesson.
How Can You Keep Your Campaigns Running Well?
Small habits beat big plans. A short routine keeps your ad campaigns fresh and your budget safe. Most problems start when nobody checks. An ad runs for weeks, the audience goes stale, and the money drains away. A calm routine prevents all three. Learning how to manage Facebook ad campaigns in Mailchimp is mostly learning to check in on time.
Consent comes first. Use only contacts who agreed to receive marketing. Your customer list is the base of every Custom Audience. A clean, consented list protects your reputation and gives Meta better details to match. Remove contacts who unsubscribe, so the audience never drifts away from your real customers.
Next, keep a simple record. After each campaign, write down four things: the goal, the audience, the budget, and the result. A short note beats a long memory. Next month, you can compare your notes and spot what worked. That quiet habit is the heart of how to manage Facebook ad campaigns in Mailchimp for small business.
Small steps add up. A tidy list, a short record, and one weekly check are enough to start. You do not need a big budget to do this well.
Conclusion
Managing ads does not have to feel scary. Now you know how to manage Facebook ad campaigns in Mailchimp for small business. Keep the connection healthy, clean your audience, update your segments, launch or pause ads in Meta’s tools, then track results and adjust. Repeat these five steps each week, and how to manage Facebook ad campaigns stay simple while your budget stays safe. I wish someone had told me this on day one. Start with step 1 today, and let the numbers guide your next move.
FAQ
1.How do I manage Facebook ad campaigns in Mailchimp as a beginner?
Start with five steps. Check the Meta connection. Clean your audience. Update your segments. Launch or pause ads in Meta. Then review the results each week. Do one step at a time. A short weekly routine is enough to begin.
2.Can I pause or stop a Facebook ad from Mailchimp?
Mailchimp’s help pages do not describe pausing ads. Meta runs and reports on the ads, so pause them in Meta’s own ad tools. In Mailchimp, you can stop sending new contacts to an ad audience. Update the segment or the flow to do it.
3.Where do I see the results of my Facebook ads?
Meta reports reach, click-through rate, and cost per click. For sales, open Mailchimp’s e-commerce reports. Go to Analytics, Reports, View Report, then the E-commerce tab. Net revenue there excludes shipping and taxes.
How do I disconnect Mailchimp from Meta?
Open the Meta Business Extension app page in Mailchimp. Click Disconnect. Then open Meta Business Manager. Go to Business settings, Integrations, Connected apps, and remove the app. To change permissions, disconnect and reconnect.
